| The Toolbox and Objects |
|
Objectives |
| Discussion |
Object-Oriented Programming
Namespaces
Imports System.IO
Toolbox
| Demonstration |
In this demonstration we will show how to add controls to the toolbox. Depending on your version of Visual Studio we will complete one of two projects.
(A) We are going to create a new and improved Hello World program by using the Microsoft Agent object. As you will soon learn we can make the Agent speak. The Agent is very powerful and can even be used to recognize your voice. This program will demonstrate the benefits of using a powerful Object-Oriented Programming language like Visual Basic.
(B) We are going to experiment with the Media player.
Follow the steps:
1. Open the project from the last lesson or create a new windows project. You should get in the habit of giving your projects relevant and meaningful names so that you can find them in the future.
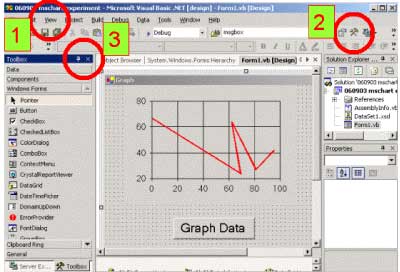
2. Referring to the figure below, the toolbox is typically found on the left side of the IDE. However you can move the toolbox. Referring to the figure, if the toolbox is not visible you can choose to view it by selecting View...Toolbox in the main menu (#1) or you can click on the Toolbox icon in the toolbar (#2). Once the Toolbox is visible you can "tack" it in place by clicking the thumbtack (#3). When the thumbtack is not clicked the Toolbox will slide back into the side. Experiment with opening and hiding the Toolbox.
3. The Toolbox contains objects or "components". When we talk about objects we must be careful about the term "object" and the term "class". A class is the definition or "blueprint" for an object whereas an object is an actual "instance" of the class. The concept of class and object is analogous to "blueprint for a house" and house. Class is to object as blueprint is to house. If we have a blueprint for a house we know how to build the house but we really don't have the house. So a blueprint defines what the house will be just as a class defines what an object will be. When we add a button to a form we are creating a button object that is just an instance of the button class. Later we will learn that we can define our own classes.
4. As you can see, the objects are grouped in categories. When you double click an object in the Toolbox it is added to the form. You can also drag an object from the Toolbox and place it on the form.
5. The Toolbox has many objects. As it turns out, many other objects exist but are not in the Toolbox. Some of these objects are already on your computer but just not shown in the Toolbox. Others can be downloaded from the Internet or purchased from other sources. There are so many objects that it is not practical to put them all in the Toolbox. Also many of the objects are for special purposes and will never be needed in a typical program; so only the most common and widely used are included in the Toolbox. Now we will add a new component to your Toolbox. Right click on the Toolbox with your mouse. Select Customize...Toolbox or Choose Items. When the Customize Toolbox window appears there will be two tabs. Select the Com Components tab. You will then see a list of objects or components.
(A) Scroll to the Microsoft Agent Control and add it to the toolbox by ensuring the checkbox is checked.
(B) Scroll to the Windows Media Player Control and add it to the toolbox by ensuring the checkbox is checked.
6A. Add an agent object to your form by double clicking the agent icon or dragging it onto your form. Change the name property of the agent in the property window. It is good programming practice to give your objects relevant names. In a future lesson we will learn about naming conventions. For now name your agent "myAgent".
6B. Add a media player object to your form by double clicking the icon or dragging it onto your form. Change the name property in the property window. It is good programming practice to give your objects relevant names. In a future lesson we will learn about naming conventions. For now name your agent "myPlayer".
7. Add a button to your form.
8A. Change the name property of the button to "btnSpeakAgent" and the text property to "SpeakAgent".
8B. Change the name property of the button to "btnChangeSong" and the text property to "Change Song".
9A. Now we are going to write the code to make the agent appear and speak to us. First we need the agent to appear. Double click on the form to open the form code window. When you double click on an object, VS opens the code window and places you in the most commonly used event for the object that you clicked. Hopefully your cursor is inside the Form1_Load event subroutine. Type in the following highlighted code:
private Sub Form1_Load(...
myAgent.Characters.Load("Merlin")
myAgent.Characters("Merlin").Show()
End Sub
This form event code is executed when the form is loaded into memory. Don't worry about the details at this point.
9B. Now we are going to add code to make a song load into the media player when the form loads (note that we could set the URL property to the song name in the properties window but we are going to set the song in code. Before we can do this we need songs. Go into the Sample Music folder and copy two songs. Paste them into the debug folder in your project folder. The path to your folder should look something like:
Documents\Visual Studio 2008\Projects\YOUR PROJECT NAME\YOUR PROJECT NAME\bin\Debug
Change the names of the music files to "songA" and "songB" leaving the file extensions.
Double click on the form to open the form code window. When you double click on an object, VS opens the code window and places you in the most commonly used event for the object that you clicked. Hopefully your cursor is inside the Form1_Load event subroutine. Type in the following highlighted code:
private Sub Form1_Load(...
myPlayer.URL = "songA.mp3"
End Sub
10A. Now run the program. Hopefully the Agent appears when the form loads. Click the SpeakAgent button. Nothing should happen because you have not programmed the button to respond to the click event.
10B. Now run the program. Hopefully songA plays when the form loads. Click the ChangeSong button. Nothing should happen because you have not programmed the button to respond to the click event.
11A. Now we will write the code so that the button does something when the user clicks on it. Double click the button so that the code window appears. Type the highlighted code in the subroutine for the click event for the button.
private Sub btnAgent_Click(...
myAgent.Characters("Merlin").Speak("Hello World")
End Sub
11B. Now we will write the code so that the button does something when the user clicks on it. Double click the button so that the code window appears. Type the highlighted code in the subroutine for the click event for the button.
private Sub btnChangesong_Click(...
myPlayer.URL = "songB.mp3"
End Sub
12. Run and test your program. If you have speakers or headphones turn them on. If you have never programmed before, you may not appreciate just how powerful VB is. In just a few lines of code you were able to make a character appear and speak or make the media player play a song. The reason you can do this is because someone else wrote alot of code to define a class for the Agent and Media Player. Now we are just creating an instance of the Agent or Media Player class and using some of the properties and methods that have been defined for it. This benefit is one of the powers of Object-Oriented Programming. Don't forget it.
| Exercises |
1. Modify the program that you created in the Demonstration to say something besides "Hello World."
2. Search through the Customize Toolbox Window. Find the Window's Media Player and add it to your toolbox. Then add a Media Player to your form. Set up the media player so that it plays a file. Be careful with your filename. Make sure that you specify the entire path and name of the file.
3. Search through the Customize Toolbox Window. Select three controls/objects. Add them to your Toolbox and to your form. Try to figure out what they do. Create a simple program to demonstrate them. Write a sentence for each control that clearly explains what the controls do.
| Links & Help |